Splitting a document into two columns helps create clean, professional layouts for newsletters, brochures, reports, resumes, and comparisons.
Columns arrange content side by side instead of in a single vertical block.
In this tutorial, you will learn two methods to create columns in Google Docs, along with when to use each.
Making Two Columns in Google Docs Using Columns
Use Format → Columns to split your document into two columns with automatic text flow.
For the full reference on column formatting behavior, see the official Google Docs documentation on columns.
When to use: When you want text to flow from the left column into the right column automatically.
The Columns option rearranges your text into multiple vertical sections without changing the content.
Steps:
Open your Google Doc.
Select the text you want to split into columns.
Note: To apply columns to the entire document, do not select any text.Click Format to open formatting options.
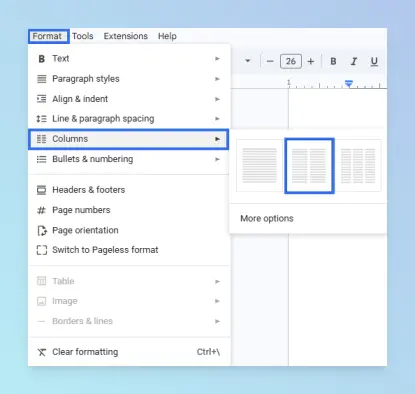
Click Columns.
Click the two-column layout icon to apply two columns.
Your text now flows automatically from the first column into the second as you type or edit content. Use the options below to control layout and appearance.
Inserting a Column break
You can control where text shifts to the second column by inserting a Column break from Insert → Break.
Use this option when you want a new section or heading to begin at the top of the next column.
Steps:
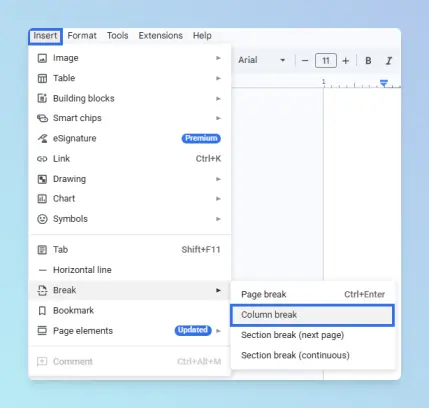
Click where you want the first column to end.
Click Insert → Break → Column break.
Enabling Line between columns and adjusting spacing
You can add a vertical divider and adjust the gap between columns using More options.
Steps:
Click Format → Columns → More options.

Check Line between columns.
Enter a value in the Spacing field.
Click Apply.
Result:
If you insert a Column break, the content after the cursor moves to the top of the next column. If you enable Line between columns or adjust Spacing, the divider and gap reflect your settings.
Limitations:
- Automatic flow is not suitable for structured content, such as resumes or comparison documents, where you need independent columns.
- If you need independent column content, use the table approach below.
Making Two Columns in Google Docs Using a Table
Use a table when the left and right sides should stay separate.
That fits resumes, side-by-side comparisons, bilingual layouts, or any case where each column has its own content.
Insert a 2×1 table to create two independent columns.
Steps:
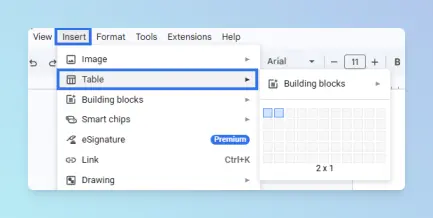
Click Insert → Table.
In the grid picker, highlight a 2×1 table (two columns and one row).
Type your first column content in the left cell.
Type your second column content in the right cell.
Your document now has two independent columns.
Hiding table borders for a borderless layout
You can hide the table grid lines by setting the Table border width to 0 pt in Table options.
Steps:
Open Table options.
- Right-click anywhere inside the table, then click Table options.
- Or click Format → Table → Table options.
Expand the Color section.
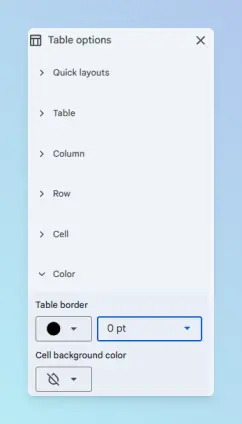
Under Table border, set the width to 0 pt to make the borders invisible.
Result:
Two independent columns appear on the page. Content in each cell stays separate and does not flow into the other column.
Note: The table is still present in the document structure. Right-click anywhere in the column area to reopen Table options if adjustments are needed later.
Comparing the Two Column Methods in Google Docs
The two approaches mainly differ in whether text flows automatically and whether you can keep each column independent.
| Feature | Columns | Table Method |
|---|---|---|
| Automatic text flow | ✅ Yes | ❌ No |
| Line between columns option | ✅ Yes | ❌ No |
| Adjustable column spacing | ✅ Yes | ❌ No |
| Independent column content | ❌ No | ✅ Yes |
| Works across multiple pages | ✅ Yes | ✅ Yes |
Recommendation
Use the table below to choose the right approach for your situation.
| Method | Best For |
|---|---|
| Columns (Format → Columns) | Flowing text across columns in newsletters, articles, and reports; using Column break and More options for fine control |
| Table method (Insert → Table 2×1) | Resumes, side-by-side comparisons, and layouts where each column stays independent |
After formatting your document in two columns, you may want to export or share it.
- If you need a shareable file for email or printing, see How to Export Google Docs as a PDF.
- If you must share a PDF that stays private, see How to Export Google Docs as Password Protected PDF.
Conclusion
Google Docs offers two effective ways to create a two-column layout. Use Format → Columns when you want continuous text flow across columns, and use a 2×1 table when you need precise control over independent content.
Choosing the right method ensures your layout behaves exactly as intended, whether you’re designing a report, resume, or comparison document.