Word documents often require signatures for contracts, approvals, and forms. A professional signature must be clear and high-contrast, properly aligned, and free of background noise.
In this tutorial, you will learn how to insert a handwritten signature in Microsoft Word, remove the background, and save it for reuse.
Steps may vary slightly by version (Word for Windows, Mac, or Microsoft 365), but the workflow remains the same.
Inserting a Signature in Word
This process inserts your signature image, removes the background, and adds a Signature Line.
For Microsoft’s official steps and options, see Insert a signature in a Word document.
Step 1. Preparing a clean signature image
Use a sharp, high-contrast signature to reduce cleanup and prevent missing strokes.
Write your signature on blank white paper using a dark pen.
Scan the paper, or take a clear photo in good light (avoid shadows and dim rooms), then save the file to your computer.
Note: Save the image as PNG (recommended for better quality and transparency support) or a high-resolution JPG.
- Zoom in on the image and confirm that the signature strokes look sharp and not pixelated.
Step 2. Inserting and cropping the signature image in Word
Insert the image, then crop it to remove extra space around the signature.
Place the cursor where the signature should appear.
Go to the Insert tab.
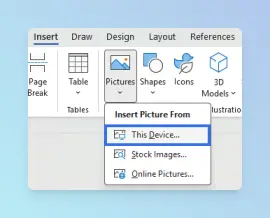
Click Pictures.
Click This Device (or Picture from File on Mac).
Select your signature image file.
Click Insert. The image appears near the cursor.
Select the signature image.
Click the Picture Format tab. In the Size group on the right, click Crop.

Drag the black crop handles inward to remove extra white space around the signature.
Click anywhere outside the image to apply the crop.
The image may include extra white space, which you will remove in the next step.
Step 3. Removing the background and positioning the signature
Remove the background and prevent the image from affecting text layout.
Select the signature image.
Go to Picture Format and click Remove Background.
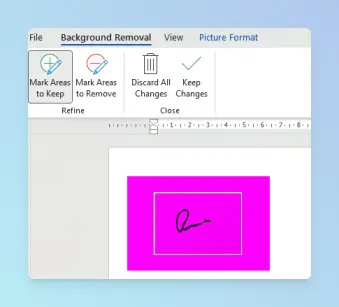
Note: Purple areas indicate parts that will be removed.
Use these tools to refine the selection:
- Mark Areas to Keep to highlight your signature strokes
- Mark Areas to Remove to clean up unwanted areas
Click Mark Areas to Keep, then click and drag over the signature strokes to mark the parts you want to keep.
Click Keep Changes. The background disappears while the signature remains.
Note: If parts of the signature disappear, click Mark Areas to Keep again and highlight only the missing strokes.
Go to Picture Format → Color.
Under Recolor, select a high-contrast option such as Black & White 75%.
Important: This increases contrast and improves signature clarity.
Select the image and click Layout Options (the small icon that appears next to the image).
Choose In Front of Text so the signature will not move your text.
Drag the signature into position. To resize, drag the corner handles to the size you need.
Step 4. Adding a Signature Line
Add a signature line to indicate where to sign and improve document structure.
Click below the signature image to place your cursor on a new line.
Click the Insert tab.
In the Text group, click Signature Line.
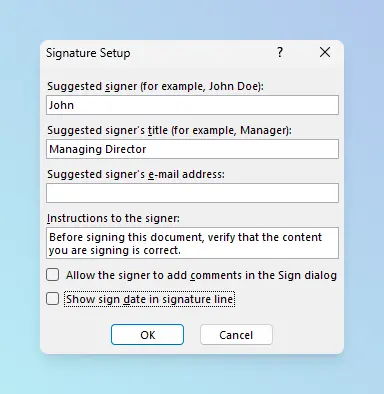
In the Signature Line dialog, enter the signer’s name in the Name field and their title in the Title field.
(Optional) Clear Show sign date in signature line if you do not want a date to appear.
Click OK to insert the signature line.
Note: If the Signature Line dialog looks different in your version of Word, confirm the fields and settings before you continue. For reference, see Microsoft’s Add a signature line.
Reusing a Signature in Word
Save the signature in Quick Parts so you can insert it into other documents without repeating the setup.
Steps:
- Drag to highlight the signature image and the signature line, or click the image, then hold Ctrl (Windows) or Cmd (Mac) and click the line.
Important: Ensure both the image and signature line are selected before continuing.
Go to Insert → Quick Parts → Save Selection to Quick Parts Gallery.
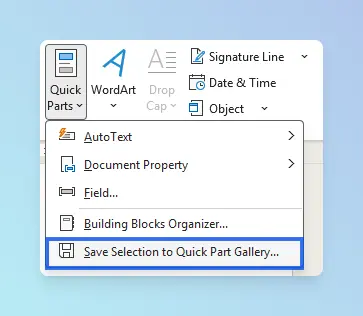
Enter a name for the saved signature block.
Click OK.
To reuse your signature: Go to the Insert tab, open Quick Parts, and select your saved signature block.
Result:
You now have a clean, aligned signature saved as a Quick Parts block for reuse in any document.
Common Issues and Fixes:
- If the signature looks blurry, use a higher-quality image with better lighting.
- If the signature does not appear on another computer, recreate it. Quick Parts is saved per device.
After inserting your signature, you may want to finalize your document:
- If you need to combine multiple signed Word documents, use Merge Docs Pro to merge Word documents into one file.
- If you need a submission-ready PDF, see How to Convert Word to PDF.
Conclusion
You now know how to insert a handwritten signature in Microsoft Word, remove the background, and format it correctly within your document.
By saving the signature as a Quick Parts block, you can reuse it instantly without repeating the setup, keeping your workflow fast and consistent.
For future documents, simply insert the saved signature from Quick Parts and position it as needed. If you switch devices, remember to recreate and save the signature again, since Quick Parts are stored locally.