Microsoft Word controls page orientation at the section level, which means changing one page requires isolating it in its own section before adjusting the layout. When changing the orientation of the entire document, no section setup is required.
This is useful when a document contains a wide table, chart, or diagram that fits landscape but the surrounding pages should stay portrait.
In this tutorial, you will learn how to make a page landscape in Microsoft Word using 4 different approaches, along with guidance on when to use each one.
- Make a single page landscape using Layout → Breaks (manual section breaks).
- Make a single page landscape using Page Setup → Selected text (automatic section breaks).
- Make all pages landscape from a specific point forward using Page Setup → This point forward.
- Make the entire document landscape using Layout → Orientation.
Making a Single Page Landscape in Word
You can make a single page landscape in Word by isolating it in its own section and applying landscape orientation only to that section.
This is needed when one page contains a wide table, chart, or diagram that does not fit in portrait layout while the rest of the document stays portrait. The two approaches below achieve that result. Choose the method that matches how much control you want over section breaks.
- Making a Single Page Landscape Using Layout → Breaks Menu - manually inserts section breaks before and after the target page, giving you explicit control over where each section begins and ends
- Making a Single Page Landscape Using Page Setup → Selected Text Option - Word inserts section breaks automatically when you apply orientation to selected content, reducing manual steps
Making a Single Page Landscape Using Layout → Breaks Menu
This approach manually places a section break before and after the target page, isolating it into its own section so you can change its orientation independently. For more on how section breaks work, see Insert a section break on Microsoft Support.
When to use: Use this method when the target page already starts on its own page, such as a full-page table, a chapter opener, or a single-page dashboard.
Steps:
Place the cursor immediately before the first character on the page you want to change to landscape.
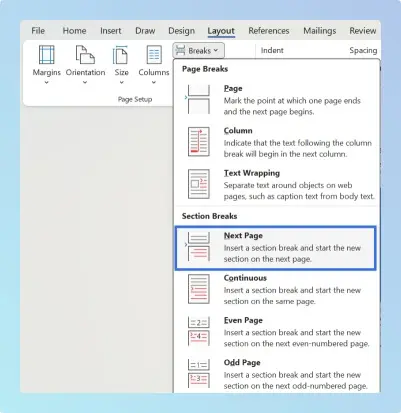
Go to the Layout tab and open the Breaks menu.
Under Section Breaks, select Next Page. This inserts a section break before the page.
Place the cursor immediately after the last character on that same page.
Insert a second section break by repeating steps 2–3. This closes the section so pages after it stay portrait.
Click anywhere on the target page (the one between the two section breaks). If you cannot tell which page that is, press Ctrl + Shift + 8 (Windows) or Cmd + 8 (Mac) to reveal the section break markers and confirm the position.
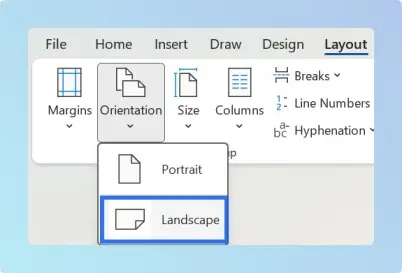
Go to the Layout tab. Click the Orientation dropdown and select Landscape.
The selected section is now landscape.
Note: These steps apply to Word 2013 and later on Windows and Word for Mac 2016 and later.
Result:
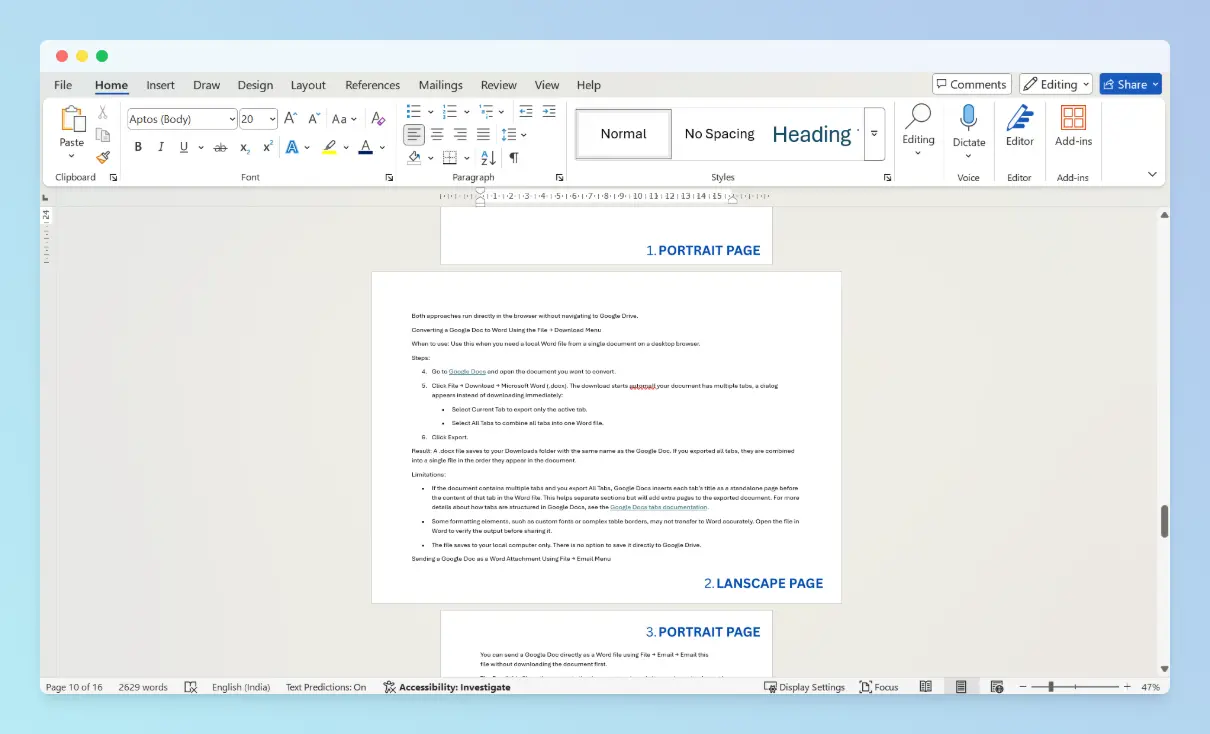
The target page changes to landscape. Pages before and after it remain portrait. To verify, go to the View tab, select Print Layout, then scroll through the document to confirm the landscape page sits between portrait pages.
Common mistake: Changing orientation without inserting section breaks first applies landscape to the entire document. Always insert breaks before and after the target page before changing orientation.
Troubleshooting:
If Word inserts a blank page after the section break:
- Press Ctrl + Shift + 8 (Windows) or Cmd + 8 (Mac) to show formatting marks.
- Locate the extra paragraph mark (¶) on the blank page.
- Press Delete.
If the page still remains, click on that same paragraph mark to select it without deleting it, then change its font size to 1 pt using the font size box on the Home tab. This minimises the space it occupies without removing it.
Limitations:
- Requires manually managing two section breaks. If either break is deleted, the sections merge and the orientation change may spread to adjacent pages. If managing section breaks manually feels error-prone, use the Page Setup → Selected text method instead. Word inserts the required section breaks automatically.
- When you delete a section break, the merged section adopts the formatting of the section that follows it. Verify the result in Print Layout view after any deletion.
If you prefer not to manage section breaks yourself, the next method applies orientation to selected content and lets Word insert the section breaks for you.
Making a Single Page Landscape Using Page Setup → Selected Text
You can make a single page landscape by selecting the content and applying landscape orientation to the selected text via the Page Setup dialog.
When to use: Use this method when the content is in the middle of a document, such as a table or chart inserted within a paragraph, and you want Word to insert the required section breaks automatically.
Steps:
Select the content you want to appear in landscape. This can be text, a table, or everything on a page. If your target is a full page, select all content on that page including the final paragraph mark. You can select across multiple pages to make all of them landscape at once.
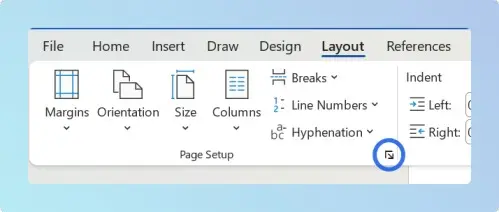
Go to the Layout tab and click the Page Setup dialog launcher. This is the small arrow in the bottom-right corner of the Page Setup group.
In the Page Setup dialog, under Orientation, select Landscape.
Open the Apply to dropdown and select Selected text.
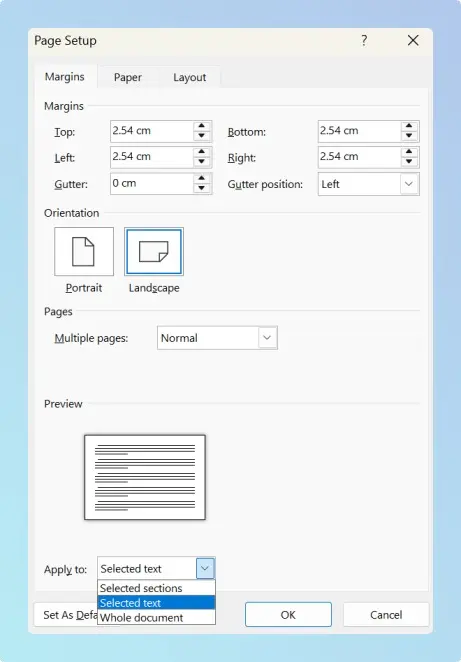
Click OK.
Result:
Word inserts section breaks before and after the selected content automatically. Only the selected content appears in landscape orientation. The rest of the document remains portrait.
Note: This is the recommended approach for most users. Word manages the section breaks, which reduces the risk of formatting errors.
Limitations:
- Selecting content across multiple pages applies landscape to all of them. Verify the selection before clicking OK.
Note on headers and footers:
- When a page changes to landscape, the header and footer rotate with it.
- If you need a different header or footer on that section, double-click the header area, then click Link to Previous in the Header & Footer toolbar to unlink it from the adjacent section.
- Page numbers continue automatically from the previous section.
Note on Word Online: Word Online does not support per-section orientation. To make a single page landscape while keeping others portrait, you must use the Word desktop application on Windows or Mac.
Both methods above isolate a single page in its own section. If you need all pages from a specific point onward to switch to landscape instead of just one page, see the next section.
Making Multiple Pages Landscape Starting from a Specific Page
You can make all pages landscape from a specific point forward using the Page Setup dialog.
Some documents require portrait pages in the main body and landscape pages in a later section. A single section break at the transition point is all that is required. Pages before that break stay portrait; everything from the break onward becomes landscape.
When to use: Use this method when the second half or final section of a document requires landscape orientation, such as an appendix, a data section with wide tables and charts, or a block of technical diagrams.
Steps:
Place the cursor at the beginning of the first paragraph or the first line of the page where you want landscape orientation to start.
Go to the Layout tab and open the Breaks menu. Select the Next Page option under Section Breaks. This separates the document at the cursor position.
Click anywhere on the first page that should be landscape (the page immediately after where you placed the cursor). If needed, press Ctrl + Shift + 8 (Windows) or Cmd + 8 (Mac) to reveal the section break marker and confirm the position.
Go to the Layout tab. Click the Orientation dropdown and select Landscape.
Alternative method using Page Setup:
Instead of inserting the section break manually, you can use the Page Setup dialog.
Place the cursor at the beginning of the first paragraph or the first line of the page where you want landscape orientation to start.
Go to the Layout tab and click the Page Setup dialog launcher. This is the small arrow in the bottom-right corner of the Page Setup group on the ribbon; it opens the Page Setup dialog where you can set orientation and scope.
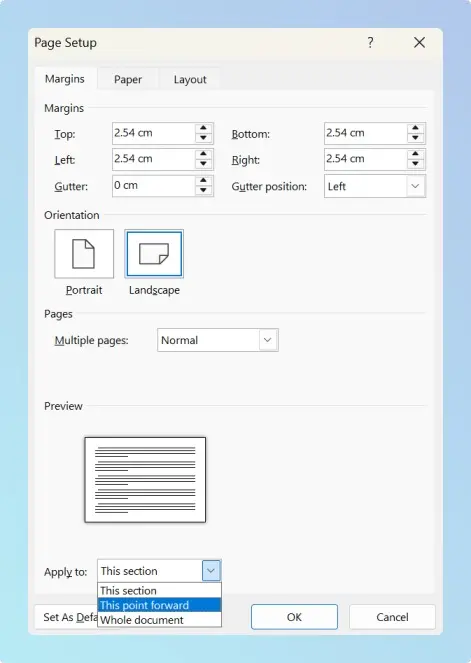
Click the Orientation dropdown and select Landscape.
Open the Apply to dropdown and select This point forward.
Click OK. Word inserts the section break and applies landscape to all following pages automatically.
Result:
All pages from the cursor position forward become landscape. Pages before the break remain portrait. Word inserts the section break automatically.
Limitations:
- To revert only some of the changed pages back to portrait, you need to insert additional section breaks within the landscape section.
- Word Online does not support per-section orientation changes.
If every page in the document needs to be landscape and mixed orientation is not required, the next approach applies the change to all pages at once without any section breaks.
Making the Entire Document Landscape in Word
You can make the entire document landscape from the Layout tab without adding any section breaks.
This is the fastest way to change page orientation in Word: no section breaks are needed, and the change applies immediately. For more on orientation options, see Change page orientation to landscape or portrait on Microsoft Support.
When to use: Use this method when every page in the document needs landscape orientation, such as when creating wide reports, brochures, or documents that contain only wide tables or exported spreadsheet data.
Steps:
Go to the Layout tab.
Click the Orientation dropdown and select Landscape.
Every page in the document switches to landscape with no section breaks.
Result:
All pages in the document change to landscape. No section breaks are created. Content adjusts automatically to the wider layout.
Note: You can also make the entire document landscape from the Page Setup dialog. Set Orientation to Landscape and select the Whole document option in the Apply to dropdown.
Limitations:
- This method applies to the entire document. It is not suitable when only some pages need landscape orientation.
- Word Online supports this method. You can change full-document orientation in the browser version of Word.
Comparing Methods for Changing Page Orientation in Word
The four approaches differ in scope, section break handling, and Word Online support.
Understanding these differences helps you choose the right approach before you start, avoiding reformatting work later.
| Feature | Layout → Breaks | Page Setup → Selected Text | Page Setup → This Point Forward | Layout → Orientation |
|---|---|---|---|---|
| Changes a single page | ✅ Yes | ✅ Yes | ❌ No | ❌ No |
| Changes pages from a point forward | ❌ No | ❌ No | ✅ Yes | ❌ No |
| Changes the entire document | ❌ No | ❌ No | ❌ No | ✅ Yes |
| Section break required | ✅ Yes (manual) | ✅ Yes (automatic) | ✅ Yes (automatic) | ❌ No |
| Supports mixed orientation | ✅ Yes | ✅ Yes | ✅ Yes | ❌ No |
| Available in Word Online | ❌ No | ❌ No | ❌ No | ✅ Yes |
| Recommended for beginners | ❌ No | ✅ Yes | ✅ Yes | ✅ Yes |
Choosing the Right Method for Your Document
- Use the Page Setup → Selected text method for most single-page changes.
- Use Layout → Orientation dropdown when every page in the document needs landscape.
The right method depends on the scope of the change and whether mixed portrait and landscape orientations are needed within the same document.
| Method | Best For |
|---|---|
| Layout → Breaks | Making a single page landscape when it already starts on its own page |
| Page Setup → Selected Text | Making content in the middle of a document landscape without manually managing section breaks |
| Page Setup → This Point Forward | Switching all pages to landscape from a specific transition point in the document |
| Layout → Orientation | Making the entire document landscape in two clicks |
Once the orientation is set, you may need to combine or continue working with the document in another format:
- To merge multiple Word documents into one file, see how to merge multiple Word documents into one.
- To open the document in Google Docs for collaboration or online editing, see how to convert Word to Google Docs.
- To apply the same single-page landscape workflow in Google Docs, see how to change one page to landscape in Google Docs.
Conclusion
You can change page orientation in Microsoft Word using four approaches, each suited to a different scope of change.
The key idea is that Word controls orientation at the section level. Once a page is isolated into its own section, you can switch it between portrait and landscape without affecting the rest of the document. With the section structure in place, switching orientation on any page becomes a repeatable process.