Microsoft Word allows you to create interactive checklists, digital forms, and task trackers using clickable checkboxes. These checkboxes let users mark items as completed directly inside the document with a single click.
In this guide, you will learn two reliable ways to insert clickable checkboxes in Microsoft Word.
- Using Check Box Content Control for professional documents and full symbol customization.
- Using Legacy Check Box Form Field for backwards compatibility with older Word file formats or protected forms.
Enabling the Developer Tab in Word
You can access clickable checkbox controls through the Developer tab, which is hidden by default. You must enable this tab before you can insert interactive checkboxes or other form controls.
The Developer tab provides access to advanced features such as macros, XML commands, and form controls. Once enabled, the tab remains visible in your Word ribbon for all future documents.
Steps:
Click the File tab at the top-left corner of the Word ribbon.
Click Options at the bottom of the left-hand navigation pane.
In the Word Options dialog, click Customize Ribbon in the left sidebar.
Locate the Main Tabs list on the right side of the window.
Find the Developer option and check the box next to it to enable the tab. Scroll down if you do not see it immediately.
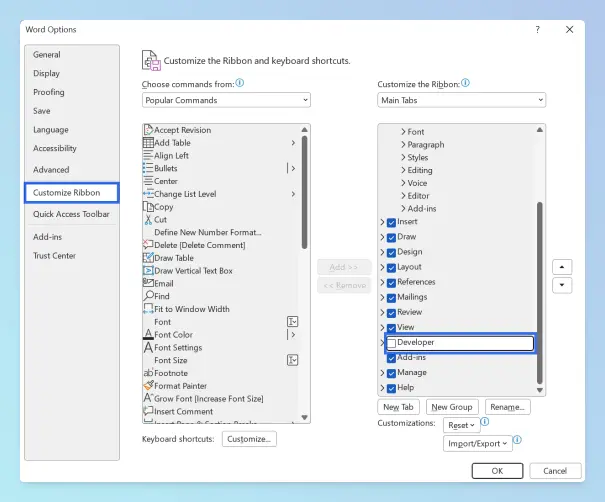
Click OK to apply the changes.
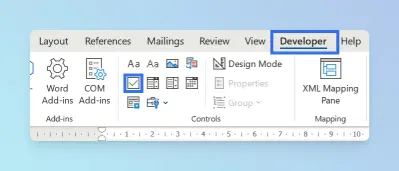
Result: The Developer tab appears in your Word ribbon between the View and Help tabs. This tab provides access to the interactive elements required for this guide:
- Controls Group: This is where you will find the Check Box Content Control, Date Picker, and Legacy Tools.
- Protect Group: Essential for Method 2, this group allows you to restrict editing so users can interact with form fields.
With the Developer tab now visible, you are ready to insert your first interactive checkbox using the modern Content Control method.
Inserting a Clickable Checkbox in Word Using Check Box Content Control
You can insert clickable checkboxes using the Check Box Content Control available in the Developer tab. This is the standard method for any Word document using the .docx file format, including Word 2016, Word 2019, Word 2021, and Microsoft 365.
This method is highly flexible and allows you to customize the symbols, colors, and behavior of the checkbox without protecting the document. It is the most efficient way to build a digital checklist in currently supported versions of Microsoft Word.
When to use: Use this method for digital documents where you need full customization, custom symbols, and a sleek interface.
Steps:
Type your list items and place the cursor exactly where the checkbox should appear.
Go to the Developer tab in the ribbon.
Click Check Box Content Control in the Controls group.
Click the checkbox once to confirm it toggles correctly.
- Troubleshooting: If you cannot click the box to change its state, ensure Design Mode is disabled in the Developer tab. When Design Mode is active, you can move or resize controls but cannot interact with them.
Result: A clickable checkbox appears at your cursor location. The control toggles between an empty state and a checked state that displays an X by default.
Limitations:
- This control is only fully compatible with the .docx file format. Users opening the document in very old versions of Word or in basic web editors may see a static symbol instead of an interactive control.
- If your audience requires broader compatibility or advanced form locking, the legacy method described below is a better fit.
Inserting a Clickable Checkbox in Word Using Legacy Check Box Form Fields
You can use the Check Box Form Field if you are working with legacy documents or require specific form-locking protection. This method ensures compatibility with older versions of Word and provides a deeper level of document control via form activation.
When to use: Use this method for legacy .doc compatibility or when building forms that require selective document protection using section breaks.
Inserting and Sizing Legacy Form Fields
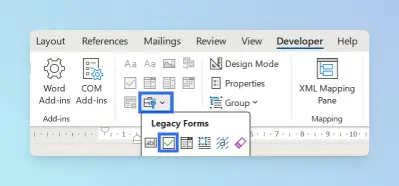
Go to the Developer tab and click the Legacy Tools icon in the Controls group.
Under the Legacy Forms section, click the Check Box Form Field option.
Double-click the checkbox before you apply protection. In the Check Box Form Field Options dialog, select Auto to match your font size or Exactly to set a specific point size (e.g., 14 pt). Click OK.
Insert Section Breaks (Optional)
If you want to keep the rest of the document editable while locking only the checklist, create section boundaries around the checklist.
Place the cursor immediately before the checklist and go to the Layout tab, click Breaks, and select Continuous. Then place the cursor immediately after the checklist and insert another Continuous section break.
This creates a separate section so protection applies only to the checklist.
Note: Skip this step if you want to protect the entire document instead of just the checklist.
Activating Legacy Checkboxes and Protecting Sections
Legacy fields remain static until you enforce document protection. Follow these steps to activate the checkboxes while keeping your other document sections unlocked.
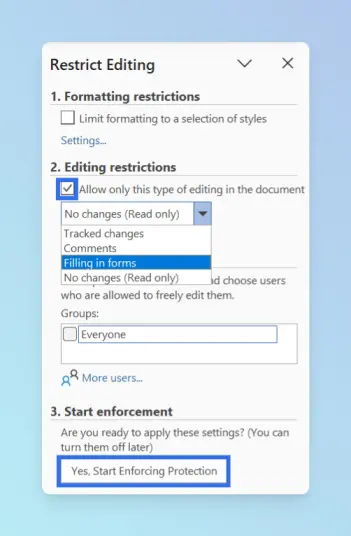
Go to the Developer tab and click Restrict Editing in the Protect group.
In the Restrict Editing pane, check Allow only this type of editing in the document.
Select Filling in forms from the dropdown list.
Select sections (if applicable): If you inserted section breaks in the previous phase, click the Select sections link.
In the Section Protection dialog, uncheck all sections except the one containing your checklist (e.g., Section 2). Click OK.
Click Yes, Start Enforcing Protection, enter a password, and click OK.
Result: Once protection is enforced, a functional checkbox appears that toggles between checked and unchecked states. Because the checklist is isolated with section breaks, the rest of the document remains fully editable.
Limitations: This method offers limited symbol customization compared to Content Controls. While Section Breaks minimize editing restrictions, legacy fields still require active form protection to remain clickable.
Once you have inserted your checkboxes using either method, you can refine their appearance to match your document’s style.
Formatting and Enhancing Clickable Checkboxes in Word
You can improve the appearance and functionality of your checkboxes through various formatting tools. These adjustments help your checklist look more professional and operate more efficiently during digital interaction.
Customizing Symbols and Resizing Checkboxes
You are not limited to the default X symbol for checked boxes. You can change it to a standard checkmark or any other character from Word’s symbol library.
Select the checkbox: Click the checkbox control you want to modify.
Open Properties: Go to the Developer tab and click the Properties button in the Controls group.
Change the symbols: In the Content Control Properties dialog, find the Checked symbol section and click the Change Button.
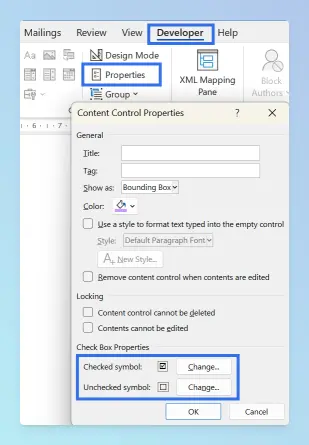
Set the font: Open the Font dropdown and select Wingdings.
Select the checkmark: Choose the standard checkmark symbol (✓) or a heavy tick.

- Note: Ensure you set the font to Wingdings to see the correct symbols. If you use a different font, a letter or an unrelated symbol may appear.
Adjust the checkbox size: Highlight the checkbox and go to the Home tab. Change the Font Size to increase or decrease the checkbox dimensions. This adjustment scales the box alongside your text for a consistent appearance.
Aligning Checklist Text and Protecting Checkboxes
When your checklist items extend to multiple lines, the text often wraps underneath the checkbox. You should use a hanging indent to keep the text aligned cleanly to the right of the control.
Apply Hanging Indents: Highlight your list, go to Home, and open the Paragraph dialog. Under Special, select Hanging and set the indent to 0.5 inches. This prevents the text from “jumping” underneath the box and ensures a professional alignment.

Lock the Structure: To prevent users from accidentally deleting your checklist text, select the list and click Group → Group in the Developer tab. This locks the text while allowing the checkboxes to remain clickable. Ensure document protection is disabled before grouping.
After setting up and styling your checkboxes, use the comparison below to confirm which method best serves your document’s final purpose.
Which Method Should You Use?
You can choose the right approach for your document by comparing the capabilities of each method. Base your choice on whether the document will be shared with users on older versions of Word or if you need a high degree of formatting control.
| Feature | Check Box Content Control | Legacy Check Box Form Field |
|---|---|---|
| Modern Interface | ✅ Yes | ❌ No |
| Custom Symbols | ✅ Yes | ❌ No |
| Formatting Flexibility | ✅ Yes | ❌ No |
| Compatibility | ✅ Yes (.docx) | ✅ Yes (.doc and .docx) |
| Works with Locking | ✅ Yes | ✅ Yes (Required) |
• Use Check Box Content Control for professional Word documents (.docx), digital checklists, and customizable forms.
• Use Legacy Check Box Form Field when working with older .doc files or when creating protected forms that restrict editing.
Once the layout is in place, you may need to adjust related settings or combine it with other documents:
- To convert your final checklist to a fixed format for sharing, see how to convert Word to PDF.
- To combine multiple checklists into one master file, see how to merge Word documents.
- To add a signature to your form or checklist, see how to insert a signature in Word.
Conclusion
You can add clickable checkboxes in Word using Check Box Content Control for most documents or Legacy Check Box Form Field for protected or older files. After inserting them, customize the symbol, alignment, and protection to build the interactive checklist you need.