
A section break splits a Word document into parts that can each have their own layout. It’s what lets one page be landscape, a thesis use Roman numerals for its front pages, or one chapter have a different header.
What a section break controls
Each section can have its own:
- margins and page orientation;
- columns;
- headers and footers;
- page numbers and their format;
- page borders and vertical alignment.
A page break only moves text to a new page. Use a section break when the next part needs a different layout.
Showing section breaks
Use this first. Section breaks are invisible until you show formatting marks.
- Go to the Home tab.
- Click Show/Hide ¶, or press Ctrl + Shift + 8.
Result: Each break appears as a dotted line labelled with its type, such as Section Break (Next Page).
Tip: Breaks are easier to spot in View > Draft, where each one spans the page width.
Inserting a section break
Use this when the next part of the document needs a different layout.
- Click where the new section should start.
- Go to Layout > Breaks.
- Under Section Breaks, choose a type.
Result: A new section starts at the cursor. Microsoft lists the types in Insert a section break:
| Type | Where the new section starts | Use it for |
|---|---|---|
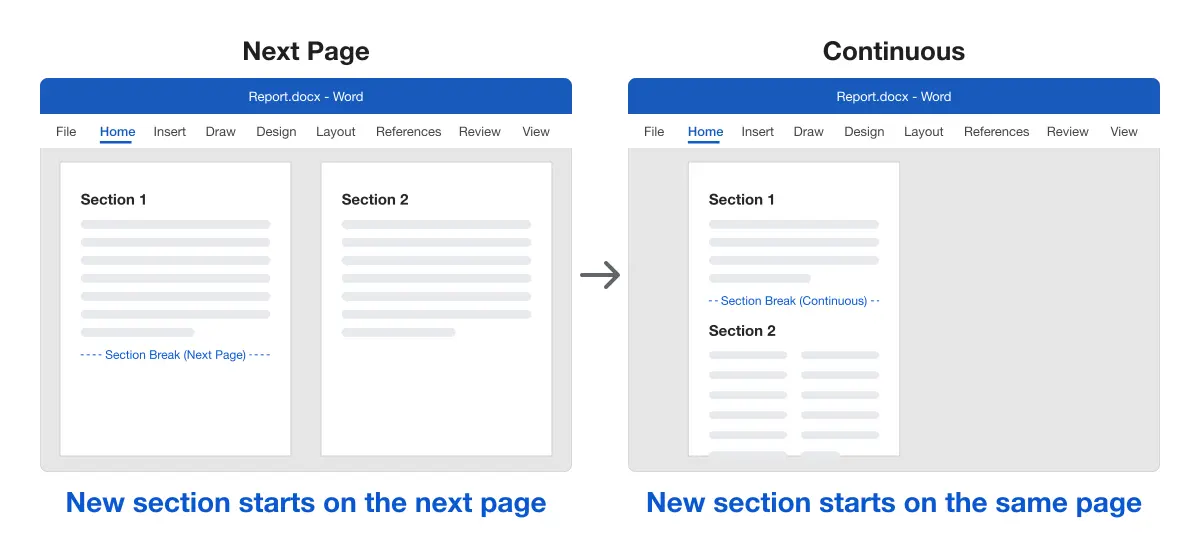
| Next Page | The next page | Chapters, landscape pages, new numbering |
| Continuous | The same page | Changing columns partway down a page |
| Even Page | The next even-numbered page | Printed books where chapters open on the left |
| Odd Page | The next odd-numbered page | Printed books where chapters open on the right |
Why the layout moves when you delete a break
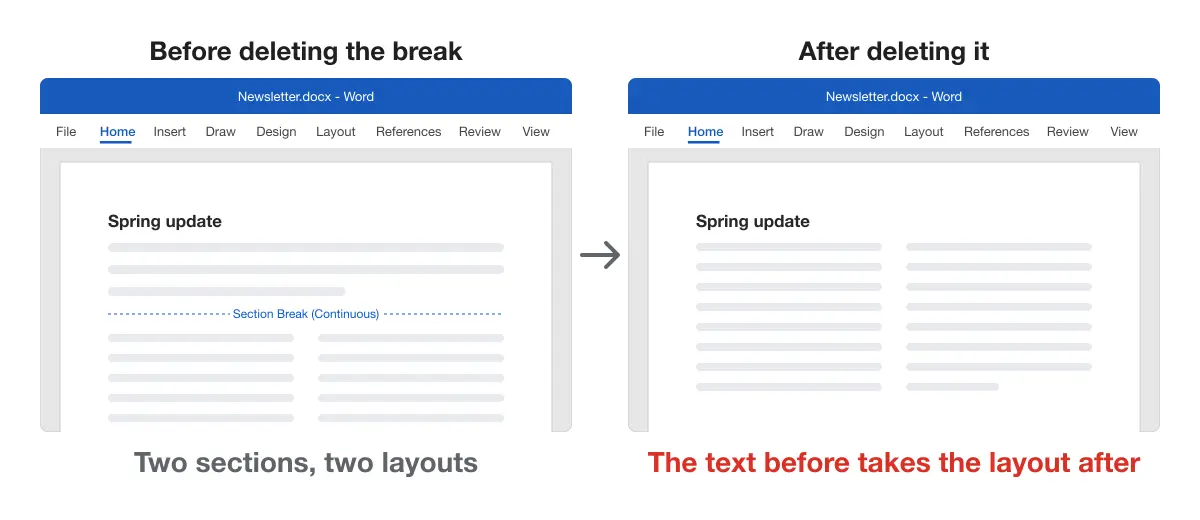
Word stores a section’s layout in the break at its end. When you delete a break, the two sections merge, and the text before the break takes the layout of the section after it.
For example, delete the break after a landscape page and the landscape page turns portrait, or the other way round. Microsoft warns about this in Delete a section break.
If the layout changes, press Ctrl + Z straight away.
Removing a section break
Use this to merge two sections into one.
- Turn on Show/Hide ¶ to see the break.
- Click just before the dotted Section Break line.
- Press Delete.
Result: The break is gone and the two sections are one. Check the pages around it, since they now share one layout.
Press Delete, not Backspace. With the cursor before the break, Backspace removes the character to its left, not the break.
To stop a break starting a new page but keep both layouts, change it to Continuous instead. Click after the break, open the Page Setup dialog from Layout, and on its Layout tab set Section start to Continuous.
To make two sections share a header again, turn Link to Previous back on rather than deleting the break.
Removing all section breaks at once
Use this to clean up a document full of breaks, for example one pasted together from several files.
- Press Ctrl + H to open Find and Replace.
- Click More, then Special > Section Break. Word types
^bin Find what. - Leave Replace with empty.
- Click Replace All.
Result: Every section break is removed, and the whole document takes the layout of the last section. Review margins, orientation, headers and page numbers afterwards.
Section breaks in common tasks
Most layout changes in Word start with a section break:
- One landscape page: see how to make one page landscape in Word.
- Roman numerals on front pages: see how to add Roman numerals and page numbers in Word.
- Numbers from page 3: see how to start page numbers from a specific page.
- A header on one page only: see how to put a header on the first page only.
- Columns on part of a page: see how to make two columns in Word.
- Different margins for one part: see how to change margins in Word.
Comparing the methods
| Task | Method |
|---|---|
| See breaks | Show/Hide ¶ or View > Draft |
| Add a break | Layout > Breaks |
| Remove one break | Click before it, press Delete |
| Remove every break | Find and Replace with ^b |
| Keep the break but stop a new page | Change it to Continuous |
Platform differences
- Windows: all steps above.
- Mac: Layout > Breaks works the same. In Find and Replace, open Advanced Find and Replace to reach Special.
- Word for the web: it can add page breaks but not section breaks, per Microsoft. Existing breaks stay in the file; use Open in Word to add or remove them.
- Google Docs: has section breaks too, under Insert > Break. See how they’re used to change one page to landscape in Google Docs.
Troubleshooting section breaks
- A blank page appeared. A Next Page, Even Page or Odd Page break is pushing text to a new page. Change it to Continuous, or see how to delete a blank page in Word.
- The header changed after deleting a break. The sections merged and kept the later section’s header. Undo, then use Link to Previous instead.
- The break won’t delete. Track Changes or editing restrictions may be on. Check Review > Track Changes, or see how to unlock selection in Word.
- Find and Replace found no section breaks. Make sure
^bis in Find what, and that Use wildcards is unticked. - Page numbers restarted at 1. A new section is set to Start at 1. Choose Continue from previous section in Format Page Numbers.
For more layout guides, see the Microsoft Word guides.