
Word’s default settings do not match APA 7, so a new document needs a few changes before it looks right. You make most of them once, in Word’s styles, and every page follows.
These steps build a student paper in Word for Microsoft 365 on Windows, with Mac and web differences near the end. The layout comes from APA’s paper format guidelines. If your instructor gives different rules, follow those.
- Set up the font, spacing and margins
- Add page numbers in the top right
- Make the student title page
- Format body text and indents
- Set up APA heading levels
- Format the references page
- Save the setup as a template
Setting up the font, spacing and margins once in styles
Use this when you start a new paper, or when a paper still has Word’s default settings.
- On the Layout tab, click Margins > Normal. This sets 1 inch on all sides.
- On the Home tab, in the Styles gallery, right-click Normal and choose Modify.
- In the Modify Style window, choose Times New Roman and 12, or another accepted font.
- Click Format > Paragraph.
- On the Indents and Spacing tab, set Special to First line and By to 0.5”.
- Under Spacing, set Before and After to 0 pt, and Line spacing to Double.
- Click OK. In Modify Style, leave Only in this document selected, and click OK.
Result: Body text appears double spaced, with no extra gaps between paragraphs.
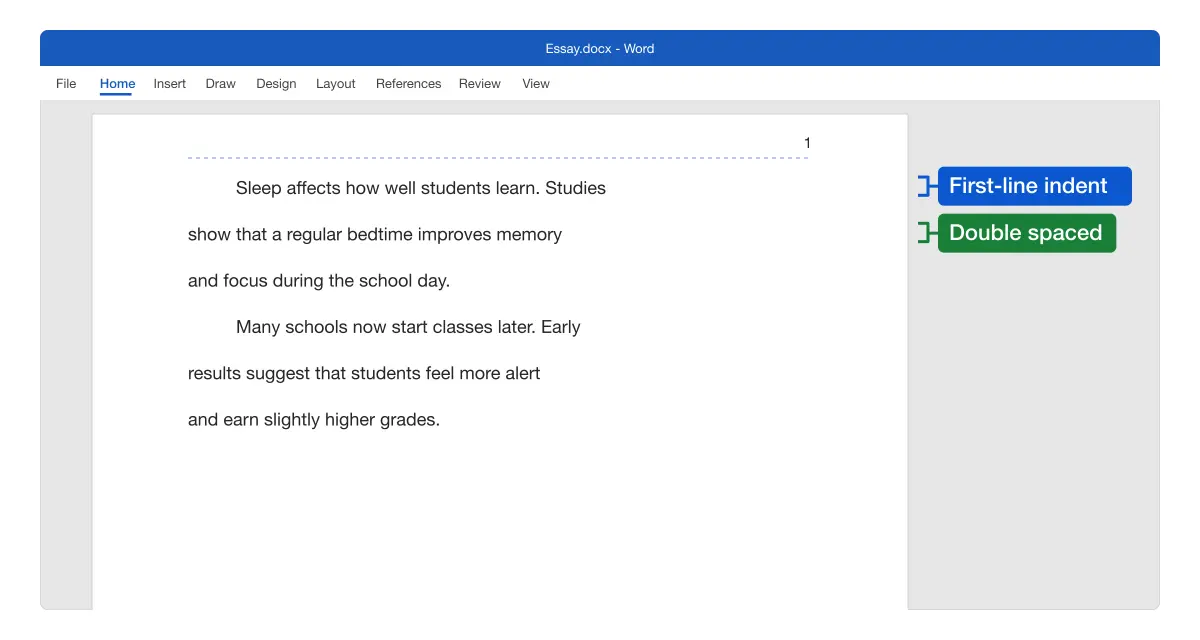
In Word for Microsoft 365, the default Normal style adds 8 pt of space after each paragraph and sets line spacing to Multiple 1.16. APA’s line spacing guidance asks for double spacing with no extra space between paragraphs.
Making the change in Normal fixes every paragraph that uses the style.
The video reaches the same result with Set As Default in the Font and Paragraph windows, choosing This document only.
To change only part of a document, see how to double space in Word and how to change margins in Word.
APA’s font guidance allows Word’s default font, and names these options:
- Serif fonts: Times New Roman 12, Georgia 11, Computer Modern 10
- Sans serif fonts: Aptos 12, Calibri 11, Arial 11, Lucida Sans Unicode 10
Note: Your instructor or publisher may require a specific font. Their rule replaces this list for your paper.
Adding page numbers in the top right
Use this when the paper needs a page number on every page, including the title page.
- On the Insert tab, click Page Number > Top of Page > Plain Number 3.
- On the Header & Footer tab, check that Different First Page is not ticked.
- Click Close Header and Footer.
Result: The number sits at the right margin on every page.
If the number looks different from your body text, double-click the header and select the number. Then choose the same font and size on the Home tab.
A student paper does not need a running head unless your instructor asks for one, but a professional paper does. APA explains both in its page header guidance.
Making the student title page
Use this when the paper needs a title page as its first page.
- At the top of the document, press Enter 3 times to leave 3 blank lines.
- Type the title of the paper, then press Enter twice to leave 1 blank line.
- Type each of these items on its own line: your name, your department and university with a comma between them, the course number and name, your instructor’s name, and the due date.
- Select all the lines. On the Home tab, click Center.
- On the Home tab, click the small arrow in the corner of the Paragraph group.
- Set Special to (none) and click OK. This removes the first-line indent, which would push the lines off center.
- Select the title only and click Bold on the Home tab.
Result: A centered title block starts on page 1, with the number 1 at the top right.
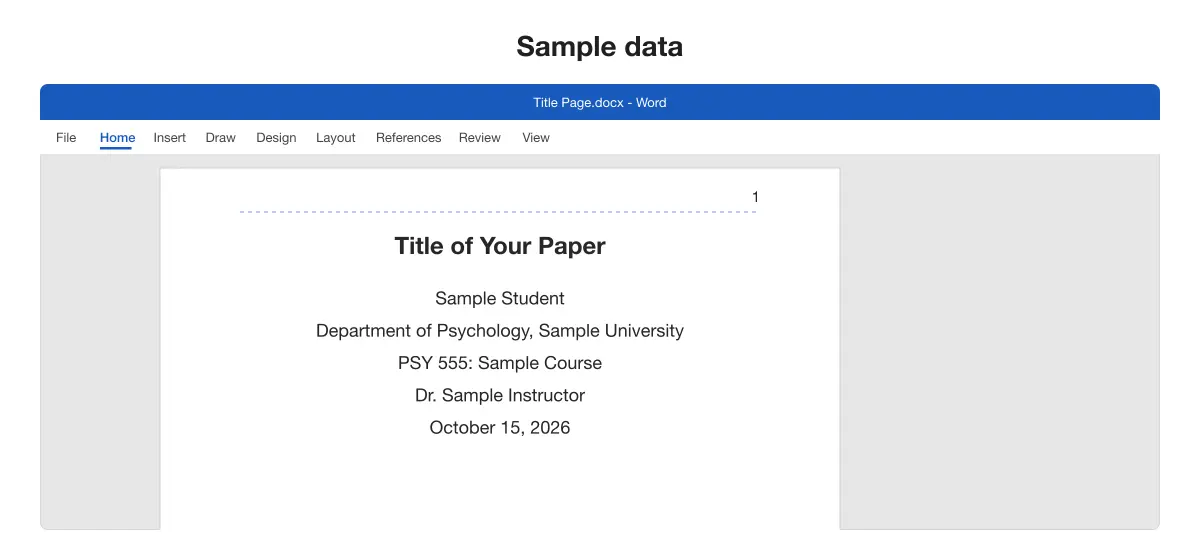
The blank lines are ordinary double-spaced lines, so you do not need to change any spacing settings. APA lists each item in its title page guidance. Write your instructor’s name the way your course materials show it.
Formatting body text and indents
Use this when the body paragraphs do not start with a 0.5-inch indent, or when you are ready to start the text.
The Normal style already holds the indent, so press Enter at the end of a paragraph and start typing. Do not press Tab as well, or the line moves in twice.
If you left the indent out of the style, press Tab at the start of each paragraph, as the video does.
- Click at the end of the due date on the title page.
- On the Insert tab, click Page Break, or press Ctrl + Enter.
- On the new page, type the title of the paper.
- Apply the Heading 1 style. Set it up first, as shown in the heading levels section.
- Press Enter and type your first paragraph.
Result: Each paragraph starts with an indent, with no blank lines between paragraphs.
If a paragraph has no indent, click in it and open the Paragraph settings from the Home tab. Set Special to First line and By to 0.5”.
If new text stays centered after the title, press Ctrl + Q to remove the paragraph formatting.
Setting up APA heading levels with Word styles
Use this when the paper has sections and subsections.
Modify Word’s built-in Heading styles instead of formatting each heading by hand. You change each style once, and the Navigation pane and any table of contents can then read your headings.
- On the Home tab, in the Styles gallery, right-click Heading 1 and choose Modify.
- Set the font and size to match your body text.
- Set the font color to Automatic or black, because Word’s default heading color is blue.
- Set Bold and Italic as the following table shows.
- Click Format > Paragraph.
- Set Alignment as the table shows, and Special to (none).
- Set Before and After to 0 pt, and Line spacing to Double.
- Click OK twice.
- Repeat for Heading 2 and Heading 3 if your paper uses them.
- To apply a level, click in the heading line and click its style in the gallery.
Result: Levels 1 to 3 appear in the Navigation pane (View > Navigation Pane) and keep their format.
| Level | Word style to modify | Alignment | Bold or italic | Case |
|---|---|---|---|---|
| 1 | Heading 1 | Centered | Bold | Title Case |
| 2 | Heading 2 | Left | Bold | Title Case |
| 3 | Heading 3 | Left | Bold and italic | Title Case |
| 4 | None: format by hand | Indented 0.5 in, on the same line as the text | Bold | Title Case, ends with a period |
| 5 | None: format by hand | Indented 0.5 in, on the same line as the text | Bold and italic | Title Case, ends with a period |
The levels follow APA’s heading guidance. The styles do not change capital letters, so type each heading in the case shown.
Note: Levels 4 and 5 share a line with the paragraph text, so format them by hand. Type the heading and text as one paragraph, select only the heading words and click Bold, plus Italic for level 5. The Normal style already indents the line.
If you do not see a heading style, click the arrow on the right of the Styles boxes.
Formatting the references page
Use this when your sources are listed and need the right layout. For the wording of each entry, see APA’s reference examples and its citation guidance.
- Click at the end of your last paragraph.
- On the Insert tab, click Page Break, or press Ctrl + Enter.
- Type
Referenceson the first line and apply Heading 1. - Press Enter and add your entries, each as one paragraph.
- Select all the entries. On the Home tab, click Sort, then click OK to put them in alphabetical order.
- With the entries still selected, click the small arrow in the corner of the Paragraph group.
- Set Special to Hanging and By to 0.5”, then click OK.
Result: The first line of each entry sits at the margin, and the later lines are indented.
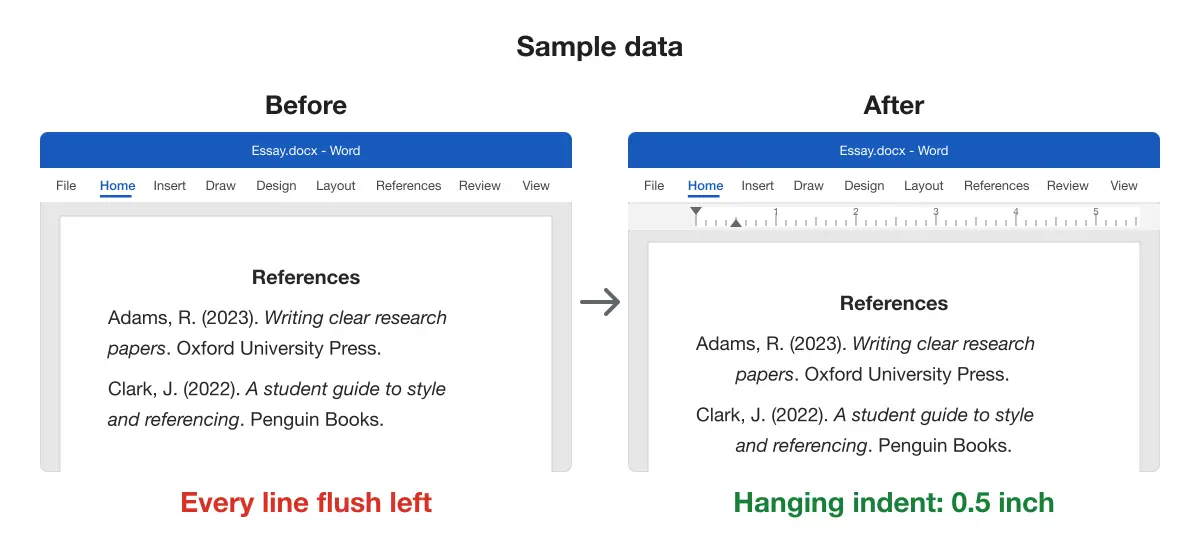
Let the text wrap by itself inside each entry. If you press Enter and Tab at the end of a line, the line breaks stay in place when the text moves.
Select only the entries, not the References label, before you apply the indent.
Tip: The video sets the hanging indent with Ctrl + T. If the first line does not return to the margin, use the Paragraph settings instead.
APA’s reference list setup page gives the rules. Our guide on creating a hanging indent in Word covers more ways to set one. If your paper is in Google Docs, see how to create a hanging indent in Google Docs.
Saving the setup as an APA template
Use this when you expect to write more than one APA paper.
Save your own template:
- Delete the text you do not want to reuse, or set up the styles in an empty document.
- Click File > Save As and choose a location.
- In the Save as type list, choose Word Template, then click Save.
- To start a paper from it, click File > New > Personal and choose your template. The button may say Custom instead.
Result: Each new paper opens with your styles, margins and page numbers in place.
To look for a ready-made template, click File > New and type APA in the search box. Compare any result with this guide before you use it, because a template’s name does not prove that it follows the 7th edition student layout.
Microsoft explains more in Create a template.
Comparing the methods
| Method | Best for | Works on |
|---|---|---|
| Modify styles in the document | One paper, with changes that apply everywhere | Word for Windows and Mac |
Your own .dotx template | Several papers with the same setup | Word for Windows and Mac |
| A template from File > New | A ready-made layout that you check first | Word for Windows and Mac |
| Manual formatting | A small fix to a few paragraphs | Word for Windows, Mac and the web |
Platform differences
- Windows: all the steps above.
- Mac: open spacing and indents from Format > Paragraph, and modify styles from Format > Style. The hanging indent shortcut is Cmd + T. To save a template, use File > Save as Template and choose Microsoft Word template (.dotx) under File Format. Start a new paper from it with File > New from Template.
- Word for the web: set margins at Layout > Margins, line spacing at Home > Line Spacing, and indents in the Paragraph settings on the Home tab. There is no Set As Default, so select the text first. For styles and templates, use Editing > Open in Desktop App.
Troubleshooting
- Extra space between paragraphs. After is still set to 8 pt. Modify the Normal style and set Before and After to 0 pt.
- Page number on the left. The number has lost its right alignment. Double-click the header, click the number and click Align Right on the Home tab.
- No number on the title page. Different First Page is on. Double-click the header and untick it on the Header & Footer tab.
- Pasted text keeps another style. The text brought formatting from its source. Paste it with Keep Text Only, or select it and click Clear All Formatting on the Home tab.
- Heading will not stay bold or black. The change was made to the text, not the style. Modify the Heading style instead.
- Lines look too far apart or too close. The spacing may be set to Multiple or Exactly. Open the Paragraph settings and set Line spacing to Double.
To check the finished paper, open File > Print and look through each page in the preview. Then turn on View > Navigation Pane to confirm that your headings are listed in order.
Next, see how to insert footnotes in Word or browse all our Microsoft Word guides.